
Discover the importance of radiator flushing, from essential tools to maintenance tips, and ensure your vehicle runs smoothly with our comprehensive guide.Maintaining a healthy vehicle is crucial for optimal performance, and one important aspect that often gets overlooked is the radiator. Over time, coolant can become contaminated with dirt, rust, and debris, leading to reduced efficiency and potential engine overheating. That’s why flushing your radiator is essential for ensuring it operates smoothly and prolonging its lifespan. In this blog post, we’ll explore the reasons behind radiator flushing, the necessary tools and materials you’ll need, and provide a step-by-step guide to effectively flush your radiator. Additionally, we’ll discuss the signs that indicate a successful flush and share valuable maintenance tips to keep your radiator in top shape. Whether you’re a seasoned DIY enthusiast or a novice car owner, this guide will equip you with the knowledge to maintain your vehicle’s cooling system efficiently. Let’s dive in!
Why flush your radiator?
Flush your radiator to maintain your vehicle’s cooling system and prevent potential issues down the line. Regular radiator flushing helps ensure the longevity and efficiency of your car. Here are some key reasons to consider:
- Remove Contaminants: Over time, rust, dirt, and debris can accumulate in your radiator. Flushing helps to remove these harmful substances, preventing them from damaging the internal components.
- Prevent Overheating: A dirty radiator can hinder coolant flow, causing your engine to overheat. Regular flushing can protect against this risk.
- Improve Cooling Efficiency: Fresh coolant can enhance the performance of your radiator, improving overall engine temperature regulation.
- Extend Life of Components: Keeping your radiator clean helps to prolong its life and that of other cooling system components, saving you money on repairs and replacements.
- Enhance Coolant Performance: Flushing allows you to replace old coolant with new, thereby restoring its effectiveness in absorbing heat and protecting engine parts.
In summary, flushing your radiator is a vital maintenance task that contributes to a healthier engine and a more reliable vehicle.
Tools and materials needed
When it comes to flushing your radiator, having the right tools and materials on hand is crucial for an efficient and effective process. Below is a list of what you’ll need:
- Radiator Flush Solution: This chemical solution helps to remove rust, sludge, and scale buildup in the radiator.
- Garden Hose: A long garden hose is essential for rinsing out the radiator and the cooling system.
- Drain Pan: A large container to catch the old coolant and radiator flush solution during the process.
- Wrench Set: You may need various sizes of wrenches or pliers to loosen and tighten radiator hoses.
- Funnel: A funnel can help in pouring new coolant back into the radiator without spilling.
- Protective Gear: Gloves and safety goggles are important to protect your hands and eyes from harmful chemicals.
Before you start, make sure that all your tools are ready and that you are working in a well-ventilated area. This preparation will help you flush your radiator effectively and safely.
Step-by-step guide to radiator flushing
Flushing your radiator is a crucial maintenance task that helps prevent overheating and ensures that your vehicle’s cooling system operates efficiently. Below is a detailed step-by-step guide to help you flush your radiator effectively:
Tools and Materials Needed
- Radiator flush fluid
- Distilled water
- Drain pan
- Hoses (if necessary)
- Funnel
- Wrench (for radiator drain plug)
- Gloves (for safety)
Step 1: Prepare Your Vehicle
Make sure your vehicle is parked on a level surface and the engine is turned off and completely cooled down. Always wear gloves to protect your hands from hot fluids.
Step 2: Drain the Old Coolant
Locate the radiator drain plug, typically at the bottom of the radiator. Place a drain pan underneath the radiator, and use a wrench to carefully open the drain plug. Allow the old coolant to drain completely into the pan.
Step 3: Flush the Radiator
Once the old coolant is drained, close the drain plug securely. Next, fill the radiator with a mixture of radiator flush fluid and distilled water as per the instructions on the flush fluid container.
Step 4: Run the Engine
Start your vehicle and let it run for approximately 10-15 minutes. This allows the flush solution to circulate through the system, loosening any built-up debris or deposits.
Step 5: Drain the Flush Solution
After the engine has run for the recommended time, turn it off and allow it to cool down. Again, open the drain plug to let the flush solution out completely into the drain pan.
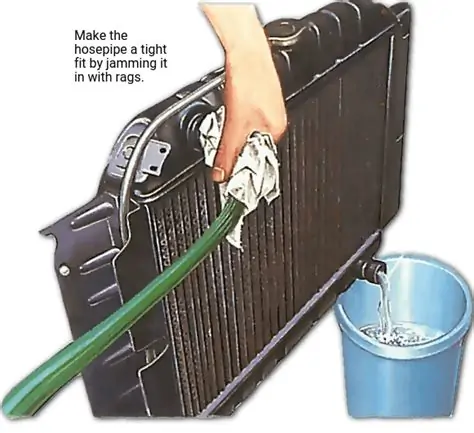
Step 6: Rinse with Distilled Water
At this stage, it’s important to rinse the radiator. Fill it with distilled water and run the engine for a few more minutes. This step helps ensure that no remaining flush chemicals are left in the system. Drain the water as you did in the previous steps.
Step 7: Refill with Coolant
Once the radiator is thoroughly flushed and drained, it’s time to refill it with the appropriate coolant mixture (usually a combination of antifreeze and distilled water). Use a funnel to prevent spills and ensure accurate filling.
Step 8: Check for Leaks
After refilling, start your vehicle once more and let it run while checking for any leaks around the drain plug or hoses. If there are no leaks, you’re all set!
Regular radiator flushing helps maintain your vehicle’s coolant system in top shape, preventing potential issues down the road. By following this step-by-step guide, you can easily tack
Signs of a successful radiator flush
Flushing your radiator is an essential maintenance task that ensures your vehicle runs efficiently and avoids overheating. But how can you tell if the radiator flush was successful? Here are some key indicators to look for:
- Improved Cooling Performance: After a successful flush, you should notice that your engine runs cooler than before. If the temperature gauge remains stable and doesn’t climb into the red zone, your flush has likely done its job.
- Clear Coolant: One of the most noticeable signs of a successful flush is the clarity of the coolant. After flushing, the coolant should be a brilliant color (typically green, orange, or pink depending on the type) and free from dirt, rust, or other contaminants.
- Reduced Overheating: If your car previously had issues overheating, a successful flush can help alleviate this problem. Keep an eye on the engine temperature and check for any spikes. Consistent, acceptable levels indicate a successful flush.
- No Leaks: After completing the flush and refilling the radiator, check for any leaks around the radiator, hoses, and connections. A lack of leaks is a strong sign that everything is sealed properly and functioning well.
- Better Heater Performance: A successful flush can also improve your vehicle’s heating system. If your cabin heater produces warm air consistently and efficiently, then the flush has likely removed blockages that affected the heater core.
- Consistent Pressure: After the flush, check the pressure in the cooling system. If the pressure holds steady and doesn’t drop rapidly, this indicates that the system is functioning as it should.
Paying attention to these signs of a successful radiator flush can help maintain your vehicle and ensure it runs smoothly for years to come. Regular radiator maintenance not only enhances performance but also extends the life of your vehicle.
Radiator maintenance tips
Keeping your radiator in top condition is crucial for the efficiency of your vehicle’s cooling system. Regular maintenance not only improves performance but also extends the life of the radiator and other components. Here are some important radiator maintenance tips to help you keep everything running smoothly:
- Check Coolant Levels: Regularly inspect your coolant levels and ensure that they are up to the recommended mark. Low coolant levels can lead to overheating and potential damage to your engine.
- Inspect Hoses and Connections: Routinely check for any leaks in hoses and connections. Cracked or loose hoses can cause coolant loss. Replace any damaged hoses immediately to prevent larger issues.
- Flush the Radiator: Schedule a radiator flush at least every two years. This removes debris and contaminants from the cooling system, ensuring that the coolant flows efficiently.
- Clean the Exterior: Keep the outside of the radiator clean and free from debris. A dirty radiator restricts airflow, reducing its ability to cool effectively.
- Monitor Temperature: Keep an eye on your vehicle’s temperature gauge. If it begins to run hotter than normal, investigate potential issues, including radiator blockages or coolant leaks.
- Use Quality Coolant: Always use the manufacturer-recommended coolant type for your vehicle. Using low-quality coolant can lead to corrosion and other long-term damage.
- Seek Professional Help: If you notice any persistent issues with your radiator, such as frequent overheating or leakage, it’s best to consult a professional mechanic. They can diagnose and fix any underlying problems quickly.
By following these radiator maintenance tips, you’ll ensure optimal performance and longevity for your vehicle’s radiator system, potentially saving you from costly repairs down the line.
Frequently Asked Questions
Why is it important to flush a radiator?
Flushing a radiator removes accumulated dirt, rust, and contaminants that can hinder its performance and lead to overheating.
What tools do I need to flush a radiator?
You’ll typically need a radiator flush solution, a garden hose, a drain pan, and basic hand tools to remove any fittings.
How often should I flush my radiator?
It’s generally recommended to flush your radiator every 2 to 3 years or as part of regular vehicle maintenance to ensure optimal performance.
Can I use just water to flush my radiator?
While water can help, it’s best to use a radiator flush solution for a more effective cleaning that can break down stubborn deposits.
What steps are involved in flushing a radiator?
The main steps include draining the coolant, adding a flush solution, running the engine for a specified time, then draining and rinsing with water.
Is it safe to flush a radiator at home?
Yes, flushing a radiator at home is safe as long as you follow the proper steps and take precautions, such as allowing the engine to cool.
What should I do if my radiator still overheats after flushing?
If your radiator continues to overheat, it may indicate other issues, such as a malfunctioning thermostat or a failing water pump, and you should consult a mechanic.