
How to Flush Your Radiator with a Garden Hose: The Complete DIY Guide
Maintaining your car’s cooling system is essential for engine longevity. In fact, old, contaminated coolant is a leading cause of overheating and premature component failure. **Fortunately**, a simple DIY flush using a garden hose can effectively remove rust and sediment, quickly restoring your system’s efficiency.
This comprehensive guide breaks down the process of performing a coolant flush using a standard garden hose. We will cover the necessary safety steps, materials, and a clear, detailed procedure. **Therefore**, you can tackle this crucial maintenance job with confidence.
For a detailed technical and historical overview of how the overall engine cooling system works, you can read the Internal Combustion Engine Cooling article on Wikipedia.
Phase 1: Essential Preparation and Safety First
Before you start, preparation is key. A radiator flush involves handling hot liquids and toxic chemicals, so proper precautions are mandatory.
Always Start with a Cold Engine
**First and foremost**, ensure your engine is completely cool. **If the engine is warm**, the cooling system is highly pressurized, and removing the radiator cap can cause hot coolant to erupt, resulting in severe burns. Wait at least two hours after driving before beginning the process.
Gathering Your Supplies
**To begin the job**, gather these essential items:
- **Safety Gear:** Goggles and chemical-resistant gloves.
- **Drain Pan:** A large, flat pan capable of holding 2-3 gallons of fluid.
- **Tools:** Pliers, screwdrivers, and a wrench for the drain plug (petcock).
- **Chemicals:** A commercial radiator flush solution (optional but highly recommended).
- **Refill Fluid:** New coolant concentrate and **distilled water** (never tap water for the final fill!).
- **Hose:** Your garden hose with a standard nozzle.
Safety and Disposal Data
**Remember that** old antifreeze is toxic, primarily due to Ethylene Glycol. The U.S. Environmental Protection Agency (EPA) emphasizes proper disposal. **Therefore**, always collect all used fluid in a sealed container and take it to a local auto parts store or hazardous waste center for recycling. Never pour it onto the ground or down a household drain.
Phase 2: Draining the Old Coolant and Cleaning
This phase involves safely emptying the contaminated fluid from the system.
Locate and Open the Drain Valve
- Park your car on a level surface.
- Locate the radiator cap and the **radiator drain plug (petcock)**, typically found at the bottom corner of the radiator.
- Place your drain pan directly beneath the drain plug.
- Remove the radiator cap to break the vacuum and speed up the drainage. **Next**, open the drain plug. Allow the old coolant to drain completely into the pan.
Apply a Flush Cleaner (Optional but Recommended)
**Once the system is empty**, close the drain plug. **Then**, pour the recommended amount of radiator flush solution into the radiator. Fill the rest of the radiator with **plain tap water**.
- Replace the radiator cap.
- Start the engine and turn the heater on max heat and fan speed. **This is important because** it opens the thermostat and allows the flush solution to circulate through the entire system, including the heater core.
- Let the engine run for the time specified on the flush product’s label (usually 10–20 minutes).
- Turn off the engine and let it cool completely again. **Finally**, drain the flush solution and tap water mixture into the drain pan.
Phase 3: Deep Flushing with the Garden Hose
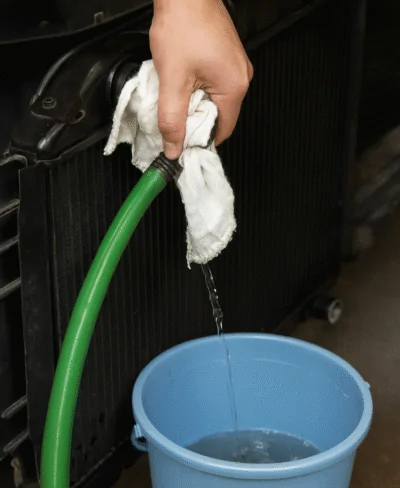
This is the key step where the **garden hose** is used to physically push contaminants out of the radiator and engine block. **Keep the water pressure low** to avoid damaging internal seals.
Using the Top Hose Inlet Method
- **Crucially**, locate and disconnect the upper radiator hose from the radiator neck.
- Place the end of the garden hose **firmly** into the radiator neck or the upper radiator hose inlet.
- Aim the detached upper hose (the one leading to the engine) towards your empty drain bucket.
- Turn on the garden hose gently. **You will immediately see** dirty water, rust flakes, and sediment pour out of the bottom radiator hose outlet and the engine hose.
- Continue flushing for several minutes. **Keep the water running until** the water pouring out of the bottom is completely clear. **In other words**, keep flushing until no more rust or debris is visible.
- Turn off the water. **Subsequently**, reconnect the upper radiator hose securely.
Visual Tip: What to Look for During the Flush
Phase 4: Refilling the System with New Coolant
The final step is to refill your system with fresh, protective coolant. **Remember**, this step requires precision to prevent air pockets.
Mixing and Filling
- Close the radiator drain plug securely.
- Consult your owner’s manual for the correct **coolant type and system capacity**.
- If using concentrate, mix it 50/50 with **distilled water**. **Specifically**, using distilled water prevents mineral deposits (like calcium and magnesium from tap water) which can cause scaling and corrosion over time.
- Use a funnel to slowly pour the new coolant mixture into the radiator neck.
Burping the System (Removing Air Pockets)
**After filling**, the system will likely contain air pockets that must be removed. This is often referred to as “burping.”
- Leave the radiator cap off.
- Start the engine and let it idle until it reaches operating temperature.
- Watch the radiator neck. **As the air escapes**, you will see bubbles rising and the fluid level may drop.
- Top off the coolant level as necessary.
- Once the bubbles stop, turn off the engine and allow it to cool. **Finally**, reinstall the radiator cap tightly.
Common Questions About Radiator Flushing (Q&A)
How often should I flush my radiator?
Most manufacturers recommend a flush every 30,000 miles or two years when using conventional (IAT) coolants. If you use extended-life (OAT/HOAT) coolants, the interval can be 5 years or 100,000 to 150,000 miles. **Always check your vehicle manual** for the exact specification.
Can I use tap water for the final refill?
**No**. While you can use tap water during the flushing process to push out sediment, the final 50/50 mix must use **distilled water**. Tap water contains minerals like calcium and iron which will quickly cause scale buildup and accelerate corrosion inside your engine and radiator. **For this reason**, investing in distilled water is critical.
What if the water never runs clear during the flush?
**If the water remains brown or rusty**, it indicates a severe buildup of corrosion inside the engine block or heater core. **In this scenario**, you may need a stronger chemical flush solution or multiple flushing cycles. If persistent, this could signal significant internal damage requiring professional service.
Summary of Maintenance and Longevity
Performing this **radiator flush** with a garden hose is a powerful maintenance procedure. **However**, it is vital to finish the job by refilling with the **correct type and ratio** of new antifreeze and **distilled water**. Following this regimen every **30,000 miles or two years** (or as directed by your manufacturer) will significantly extend the life of your water pump, radiator, and—most importantly—your engine. **For new car owners**, it is particularly helpful to review key preventative steps to ensure engine health; you can find more crucial details in these radiator maintenance tips.