
Learn how to effectively identify and resolve radiator clogs, choose the right flushing solution, and test the results for optimal performance.When your vehicle’s radiator starts to overheat or shows signs of a clog, it can lead to serious engine issues if left unaddressed. Flushing a clogged radiator is an essential maintenance task that can help restore proper coolant flow, improve engine performance, and prolong the life of your vehicle. In this blog post, we will walk you through the essential steps of flushing a clogged radiator, from identifying the problem to testing the effectiveness of your efforts. We’ll cover how to determine the cause of the blockage, the best flushing solutions to use, and a step-by-step guide to executing a thorough radiator flush. Whether you’re a seasoned DIYer or a novice car owner, this guide will equip you with the knowledge needed for efficient radiator maintenance. Let’s get started!
Identifying the radiator clog
To ensure your vehicle operates efficiently, it’s crucial to know how to identify a radiator clog. A clogged radiator can lead to overheating and potential engine damage. Here are some signs to look out for:
- Overheating Engine: One of the most common signs of a clog is an overheating engine. If your temperature gauge frequently hits the red zone, it could mean the coolant isn’t circulating properly.
- Reduced Coolant Levels: If you notice your coolant levels dropping without any visible leaks, a clog may be preventing proper movement of coolant.
- Coolant Leaks: Puddles of coolant underneath the vehicle can indicate a blockage, which could cause pressure build-up and leaks.
- Cold Spots on Radiator: If you feel your radiator and notice cold spots, it likely indicates that some passages are clogged, preventing proper flow.
- Unusual Noises: Hear any gurgling or bubbling sounds coming from your radiator? This can suggest air pockets caused by a blockage.
It’s essential to regularly check your vehicle’s cooling system to catch any clogs early. If you identify any of these symptoms, it might be time to take action and further investigate the radiator for clogs.
“Ignoring the signs of a clogged radiator can lead to costly repairs down the line.”
Determining the cause of blockage
When it comes to flushing a clogged radiator, one of the most critical steps is diligently identifying the cause of the blockage. Understanding the root of the problem can help ensure effective resolution and prevent future issues. Below are some common culprits that may be causing your radiator to clog:
| Cause | Description |
|---|---|
| Rust and Corrosion | The internal parts of the radiator can rust over time, leading to debris accumulation. |
| Debris and Sediment | Particles from the engine or external sources can settle in the radiator and create blockages. |
| Old Coolant | If coolant is not replaced regularly, it can degrade and contribute to clogging. |
| Leaks | A leak in the cooling system can introduce air into the radiator, which may lead to rusting and blockages over time. |
To correctly identify the exact cause of your clogged radiator, consider the following diagnostic steps:
- Visual Inspection: Check for visible signs of rust, leaks, or corrosion around the radiator and connecting hoses.
- Coolant Check: Evaluate the quality of the coolant. If it appears rusty, dark, or contaminated, it’s a clear indicator of a problem.
- Temperature Monitoring: During operation, watch for abnormal temperature readings on your vehicle’s dashboard; overheating could signify a blockage.
- Flow Test: If accessible, you can perform a flow test to determine if coolant is circulating properly. Blocked flow may suggest a clog.
By carefully assessing these factors, you can effectively determine the cause of the blockage in your radiator. This understanding will guide you in selecting the right approach
Selecting the appropriate flushing solution
Choosing the right flushing solution is crucial for effectively clearing a clogged radiator. With the various options available on the market, it is essential to understand which products will deliver optimal results without causing damage to your vehicle’s cooling system.
When selecting a flushing solution, consider the following factors:
- Type of Coolant: Ensure the flushing solution is compatible with the existing coolant type in your radiator. This is often either conventional or ethylene glycol-based.
- Type of Clog: Determine if the clog is due to rust, debris, scale buildup, or a combination of factors. Some flushing solutions are specifically formulated to tackle certain types of clogs, such as rust removers or scale dissolvers.
- pH Level: It is essential to choose a solution with a safe pH level to avoid corrosion. A pH level of around 7 is generally safe for most radiators.
- Safety: Opt for non-toxic and biodegradable options if you are concerned about the environment. Look for flushing solutions that are labeled as eco-friendly.
Here are some popular flushing solutions categorized by their effectiveness:
| Flushing Solution | Best For | Notes |
|---|---|---|
| Prestone Radiator Flush | General cleaning | Safe for all cooling systems and effective against rust and scale. |
| BlueDevil Radiator Flush | Heavy clogs | Breaks down tough deposits and is safe for aluminum radiators. |
| Cataclean Engine and Catalytic Converter Cleaner | Oil residue and sludge clogs | A high-performance formula for thorough cleaning. |
| Liquid Wrench Radiator Flush | Rust and corrosion | Designed for severe rust removal without harming the system. |
In summary, selecting an appropriate flushing solution for your clogged radiator should hinge on the nature of the clog, compatibility with your vehicle’s existing system, and the product’s safety standards. Always follow the manufacturer’s instructions for the best results.
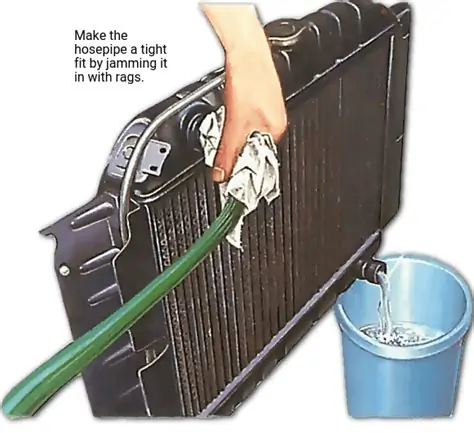
Executing the radiator flush process
Once you have identified the blockage and selected the appropriate flushing solution, it’s time to move on to executing the radiator flush process. This step is crucial to remove any accumulated debris, rust, or contaminants that could be affecting the efficiency of your radiator.
Materials Needed
- Flushing solution
- Hoses
- Container for used fluid
- Wrench
- Water source (garden hose or bucket)
- Protective gloves and eyewear
Step-by-Step Process
- Safety First: Before beginning, ensure that the engine is cold to prevent burns. Wear protective gloves and eyewear to safeguard against splashes.
- Drain the Radiator: Locate the radiator drain valve (usually at the bottom of the radiator). Place a container underneath it and open the valve to let the old coolant drain out completely. Close the valve once drained.
- Mix the Flushing Solution: Follow the instructions on the flushing solution container to prepare the solution. It might involve diluting the product with water, depending on the manufacturer’s recommendation.
- Fill the Radiator: Pour the flushing solution into the radiator until it’s filled to the appropriate level. If needed, also fill the overflow tank.
- Run the Engine: Start the engine and let it run with the heater on full blast. This will help circulate the flushing solution throughout the system. Keep an eye on the temperature gauge; if it gets too hot, turn off the engine.
- Let it Circulate: Allow the engine to run for about 10-15 minutes, allowing the flushing solution to break down any buildup inside the radiator.
- Drain the Solution: Turn off the engine and let it cool. Again, drain the flushing solution from the radiator into the container.
- Rinse with Water: After draining the flushing solution, it’s essential to rinse the radiator with clean water. Fill the radiator with water, run the engine briefly, and drain again. Repeat this process until the water runs clear.
- Refill with Coolant: Once the flushing and rinsing are complete, close the drain valve. Refill the radiator with fresh coolant, ensuring you follow the manufacturer’s specifications for the correct mixture.
- Check for Leaks: After filling, start the engine and let it run for a few minutes to circulate the new coolant. Inspect for any leaks around the radiator and hoses.
By following these steps, you will successfully complete the flushing process, improving the overall performance and efficiency of your radiator.
Testing the effectiveness of the flush
After completing the radiator flush process, it’s essential to test the effectiveness of the flush to ensure that your radiator is functioning optimally. Below are some key steps and considerations for testing:
- Check the Coolant Levels: Start by checking the coolant level in the radiator. Ensure that it is filled to the appropriate level as specified in your vehicle’s manual.
- Inspect for Leaks: After the flush, inspect the radiator and surrounding hoses for any signs of leaks. Look for puddles on the ground or damp spots that may indicate fluid leakage.
- Evaluate the Temperature: Allow your engine to run for a short period and monitor the temperature gauge. The engine should reach the normal operating temperature without overheating. If it does, it may indicate an issue still exists.
- Examine the Flow: With the engine idling, check the flow of coolant through the radiator. Remove the radiator cap carefully and observe whether the coolant is flowing smoothly. This indicates that the rad is now unclogged.
- Road Test: Finally, take the vehicle for a short drive. Monitor the temperature gauge and pay attention to any unusual sounds or performance issues. A successful flush should result in improved engine performance and proper heating.
If the radiator still exhibits issues after the flush, you may need to revisit previous steps to ensure that all clogs have been addressed, or consider consulting a professional mechanic.
Regular maintenance, including flushing the radiator, can extend the life of your vehicle and avoid costly repairs. – Auto Care Expert
Frequently Asked Questions
What are the common signs of a clogged radiator?
Common signs include overheating engine, coolant leaks, and inconsistent heating in the vehicle.
What tools do I need to flush a clogged radiator?
You’ll typically need a radiator flush kit, water hose, bucket, and potentially a wrench for the drain plug.
Is it necessary to flush the radiator regularly?
Yes, regular flushing helps remove rust, sediment, and scale build-up, ensuring efficient cooling and extending the radiator’s lifespan.
How can I identify if my radiator is clogged?
You can check for clogs by feeling the radiator for hot and cold spots or noticing poor coolant flow.
Can I flush the radiator myself?
Yes, flushing the radiator can often be done as a DIY project with the right tools and precautions.
What steps are involved in flushing a clogged radiator?
The steps generally include draining the coolant, adding a flushing agent, running the engine, draining again, and then refilling with fresh coolant.
What should I do if flushing the radiator doesn’t resolve the issue?
If flushing doesn’t help, consider consulting a professional mechanic to check for internal problems or other cooling system issues.